Calibration
The Calibration page at /calibration has two sections: the Camera Calibration Wizard and Strobe Calibration.
Calibration is how PiTrac learns about your camera setup: where the cameras are positioned, what angle they're at, and the characteristics of your lenses. Without calibration, PiTrac can't accurately convert what it sees in 2D images into real 3D ball flight data.
Status Bar
At the top of the calibration page, a status bar shows:
- PiTrac Status: whether the launch monitor process is currently running or stopped.
Camera Calibration Wizard
The wizard has 4 steps with a progress indicator at the top.
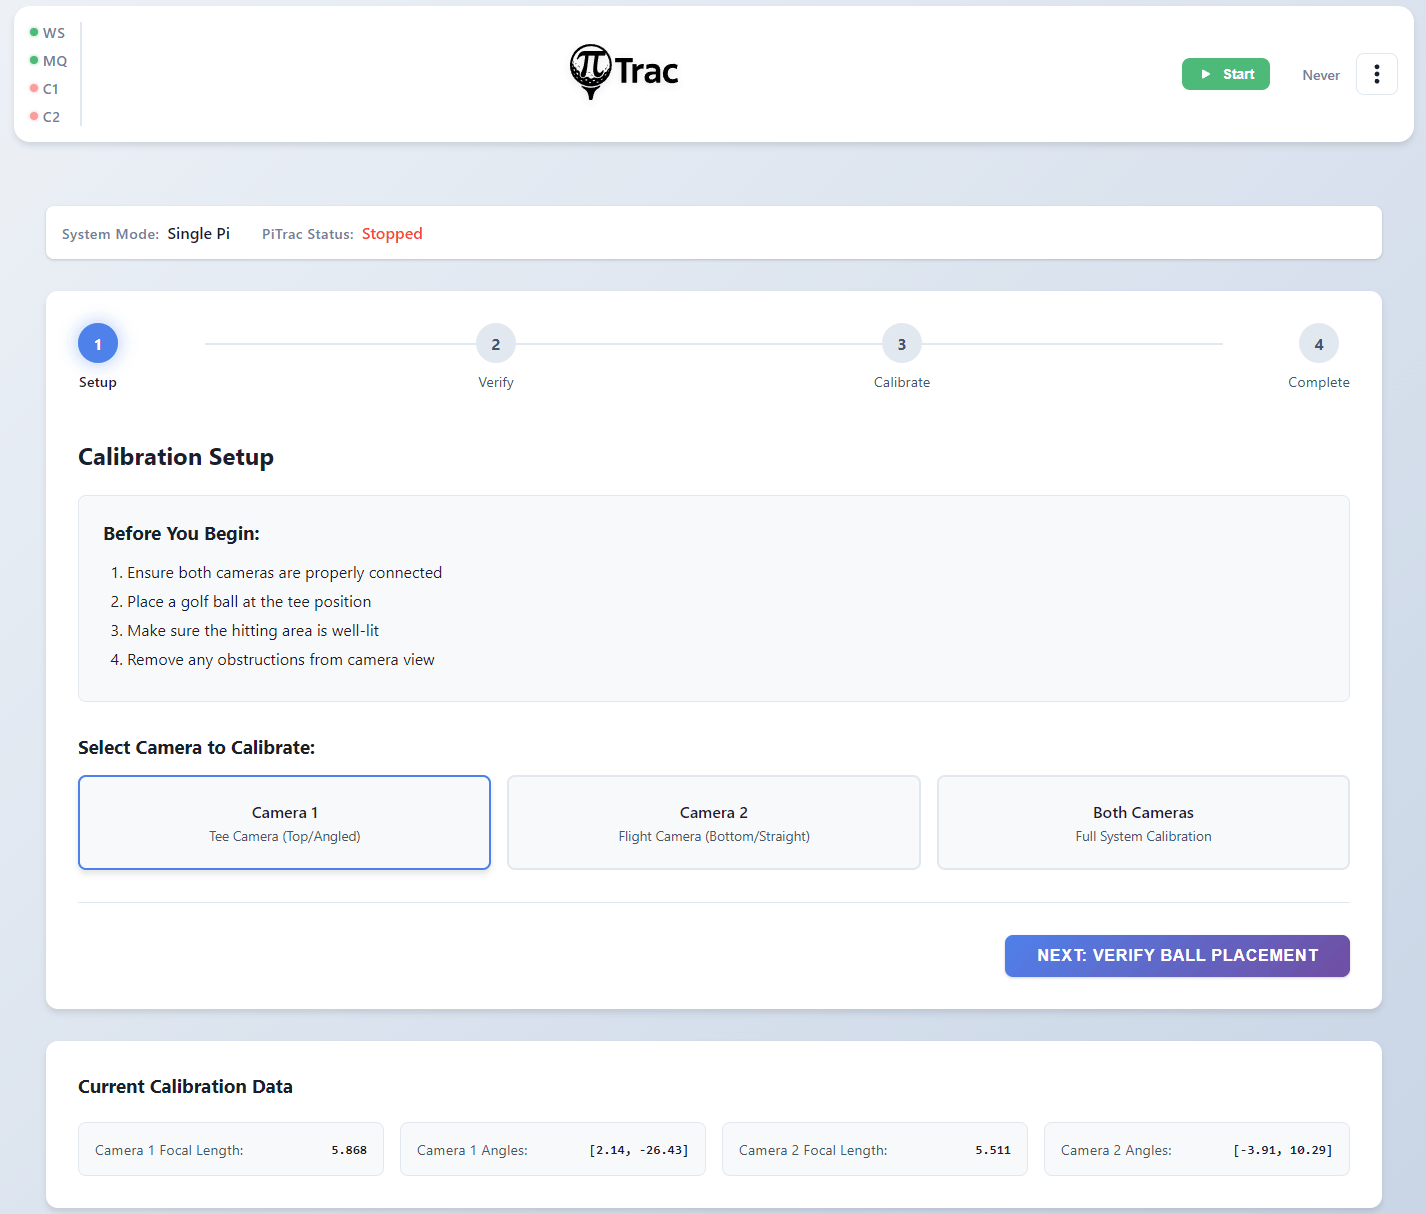
Step 1: Setup
Pick which camera to calibrate:
- Camera 1 (Tee Camera, Top/Angled or Straight). ALWAYS START HERE. Faster calibration.
- Camera 2 (Flight Camera, Bottom/Straight). Do this second. Takes longer.
- Both Cameras (Full System Calibration). Calibrates both sequentially.
Click "Next: Verify Ball Placement" when ready.
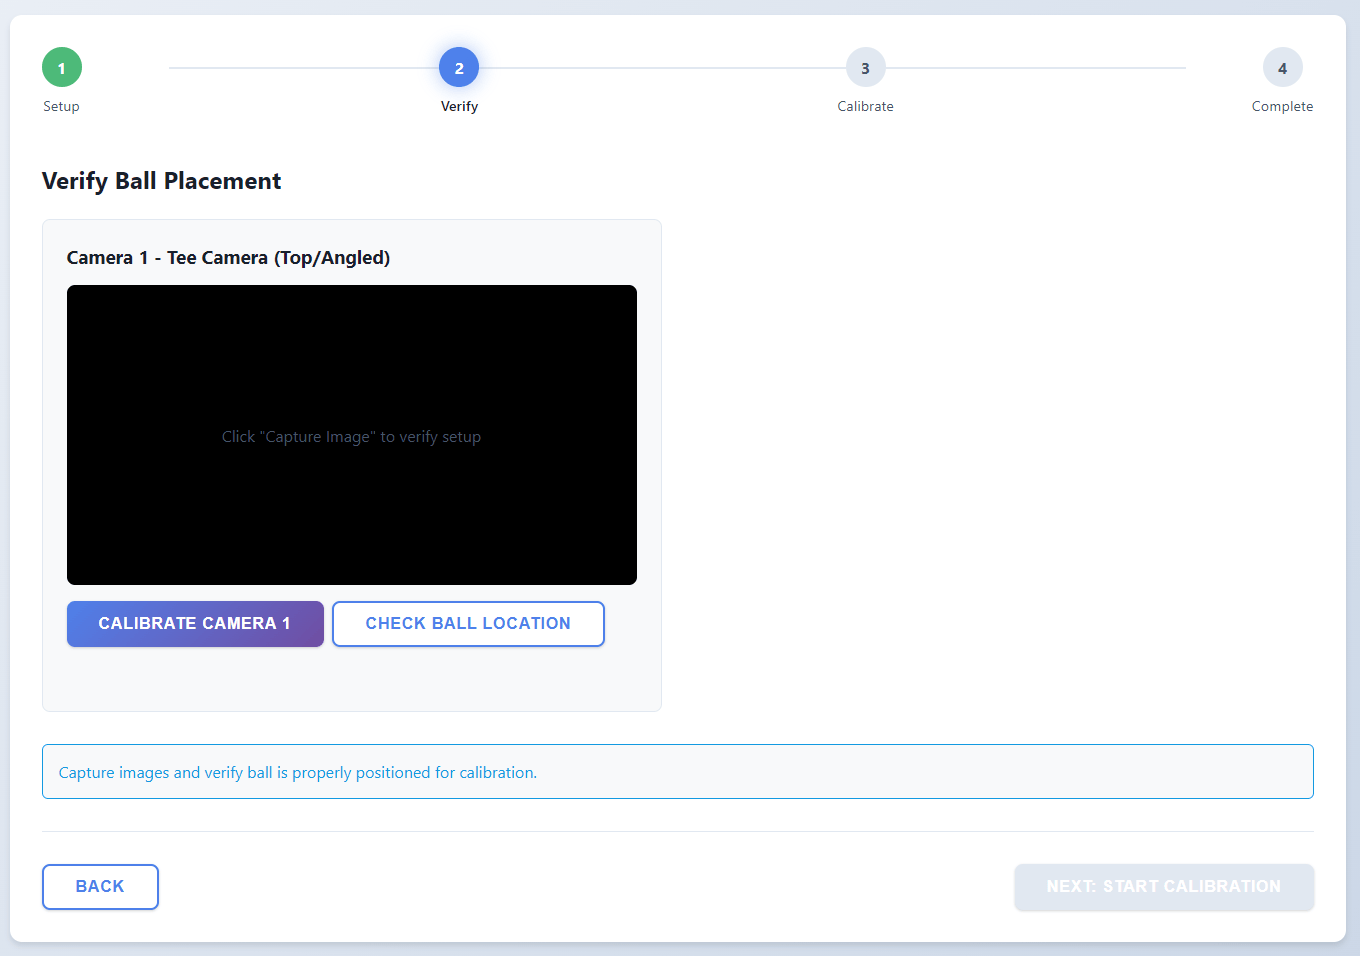
Step 2: Verify Ball Placement
This step makes sure PiTrac can actually see the ball before trying to calibrate.
For each selected camera, two controls are available:
Calibrate Camera [N] runs auto-calibration for that camera (POST /api/calibration/auto/{camera}). Displays the calibration image if available.
Check Ball Location runs a quick ball detection test (POST /api/calibration/ball-location/{camera}):
- Green status: ball found, coordinates shown.
- Red status: no ball detected, adjust placement.
If ball detection fails:
- Make sure ball is on the tee.
- Check lighting (too dark? too bright?).
- Verify camera is aimed at the ball.
- Try adjusting camera gain in Configuration.
Once ball placement is verified for all selected cameras, click "Next: Start Calibration."
Step 3: Run Calibration
Pick your calibration method:
Auto Calibration (Recommended):
- Fully automatic
- Usually more accurate
- Just click and wait
Manual Calibration (Advanced):
- For when auto fails or you want fine control
- Longer timeout
- Not for first-timers
During calibration:
- Progress bars show calibration progress for each camera.
- A process log shows timestamped status messages.
- A "Stop Calibration" button allows aborting.
Completion indicators:
- "API Callbacks Received": best result, calibration data sent back via API.
- "Focal Length" / "Camera Angles": individual data points received.
- Progress bar turns red on failure.
Step 4: Results
You'll see result cards for each calibrated camera showing:
- Status: Success or Failed
- Completion Method: how calibration finished (API callbacks, process exit, timeout)
- Focal Length: number in pixels (e.g., "1025.347")
- Camera Angles: array of angles in degrees (e.g., "[12.45, -6.78]")
Actions:
- Calibrate Again restarts the wizard.
- Return to Dashboard goes back to the main page.
When to Recalibrate
You need to run calibration:
- First time setup
- After moving cameras
- After changing lenses
- If shots are consistently reading wrong
- After crashing into the camera with a club
You DON'T need to recalibrate:
- Every time you use PiTrac
- After adjusting camera gain
- After tweaking ball detection settings
- Just because you feel like it
Calibration results are saved to ~/.pitrac/config/calibration_data.json and persist across reboots. Even if you reset configuration to defaults, calibration data stays safe.
Strobe Calibration
Below the camera calibration wizard is the Strobe Calibration section for V3 Connector Boards.
Status bar shows:
- Board: V3, or "Not set" if board version is not configured.
- Saved DAC: current calibrated DAC value in hex (e.g.,
0x96), or "Not calibrated". - State: Idle, Running, Complete, or Failed.
Controls:
- LED Type dropdown: select "V3 LED Board (10A)" or "Legacy 100W LED (9A)".
- Calibrate button (or "Recalibrate" if already calibrated) starts the DAC calibration process.
- Cancel button appears during calibration to abort.
Note
If the board version is not set to V3, the strobe calibration controls are disabled and a warning appears directing you to set the board version in Configuration.
How it works:
The calibration process controls the MCP4801 DAC and MCP3202 ADC over SPI to find the correct DAC value that produces the target LED current. It sweeps DAC values, measures the LDO voltage and LED current, and converges on the target. The process includes safety checks:
- Pre-flight current check (detects blown MOSFET)
- LDO voltage bounds checking
- Hard cap on LED current (12A maximum)
Results show:
- DAC Setting (hex value)
- LED Current (amps)
- LDO Voltage (volts)
Current Calibration Data
At the bottom of the Calibration page, a "Current Calibration Data" section displays the saved calibration values for both cameras (focal lengths and angles), loaded from /api/calibration/data.